CO327 Terminal Session 2

The objectives of this session are

  • To do the setups necessary for working on the module
  • To create a new web page using the web editor Amaya
  • To publish the page on a website

Setting up your system

We will be making use of the text editor Notepad++ and the web editor Amaya on this module. You will also be storing files on the server called raptor. There are some preliminary setups that need to be done before you can use these facilities.

Follow the setup instructions carefully. Consult your class supervisor if you get any problems. Then come back to this page.
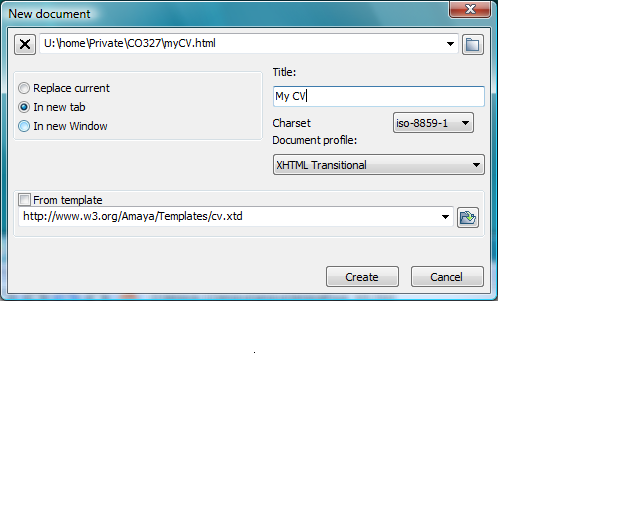
Creating a new web page

Now that you have completed the setup exercises, there are two places where you can store files on raptor:

  1. your Private folder where you can store files that only you can read;
  2. your public_html folder where you can publish web pages for other people on campus to view.

When developing new web pages, you should create and check them in your own space first and only publish them for others to read when they are complete and correct. Use your CO327 folder under your Private folder to store and work on new web pages. Later you can save a copy in your public_html folder.

The new file

Start up Amaya. Select File -> New -> New XHTML document

In the pop-up window:

  1. use the browse facility to locate your CO327 folder and click on OK. Note that the drive letter may be different for you than is shown in the diagram.
  2. edit the name of the file to be myCV.html;
  3. enter My CV into the Title box. That will appear in the title bar of the web browser when the page is published.
new file in Amaya

Adding the content

Amaya has a WYSIWYG interface, like a Word processor. In the left hand pane is a set of buttons that will generate headings, lists, links and will also allow you to format the text for emphasis. Experiment with these facilities to generate a structured and effective CV. You can invent the content - it does not have to be accurate.

Notes:

  1. When making a bulleted list, use the Enter key repeatedly to move from element to element. For example, after adding the first bulleted point, press Enter twice to move to the next point. Press Enter three times to end the list. Similarly for other lists.
  2. The buttons marked emphasis and strong will allow you to format the text. Emphasis will give an italic or oblique font, as available, while strong will give a bold or equivalent font.

You will need to Save the document explicitly from time to time. Do this regularly, every few lines or so. You do not want to have to retype much after cases of machine failure.

Publishing the page

At this point your website is stored in your private filespace and is not viewable by anyone else. To publish it across the campus,

  1. make sure that you have saved the document after your most recent edit;
  2. then select File -> Save As and use the pop-up window to navigate to your public_html folder.

To check that the file has been stored successfully, ask your neighbour in the class to view it.

Extension exercise in class

If time, experiment with further features of Amaya. For example, there are different ways in which you can view a web page. So far we have been using the formatted view which shows you approximately what the page will look like if viewed in one of the popular browsers. but Amaya can also show you the structure of the page and/or the xhtml code which produces it. Use the View menu to experiment.

Self study: in your own time

Work through the Amaya User Manual to become familiar with how the software tool works.

Janet Linington (2006), Updated: Tim Hopkins (2010)